Слои проекта и проверки безопасности
Слой проекта (пайплайн) - это группирующая сущность для Проверок безопасности. У пользователя есть возможность создания новых и настройки доступных, в соответствии с назначенной ролью, ранее созданных Слоев проекта.
В TRON.ASOC каждый Слой проекта привязан к проекту.
Для того, чтобы начать работу со Слоями проекта, необходимо перейти в раздел Проекты, найти необходимый проект, открыть его обзор, после чего перейти на вкладку Слои проекта.
Слои проекта представлены в виде иерархии с настраиваемой вложенностью (по умолчанию, максимальное количество слоев - 10, но при развертывании системы предусмотрена возможность скорректировать максимальную вложенность), что позволяет гибко добавлять архитектурные объекты исходя из потребностей и процессов разработки.
Каждый Слой проекта представлен отдельным объектом иерархии, в детальном виде которого содержатся следующие параметры:
- Название слоя - название слоя
- Статус проверок безопасности - общий статус по проверкам слоя, возможны следующие статусы:
- Готово
- Еще нет запусков
- Не завершен
- В процессе
- Контроль провален
- Контроль пройден
- Результаты сканирования по выбранному слою
- Проблемы безопасности по выбранному слою
- Контроли качества по выбранному слою
- Начать новое сканирование - запуск сканирования
- Список проверок безопасности.
В свою очередь, по каждой проверке безопасности в рамках слоя отображаются следующие данные:
- # - порядковый номер проверки безопасности
- Источник - название источника сканирования
- Инструмент - название инструмента безопасности
- Запуск (Ручной/Автоматический)
- Контроли качества (если есть, а также кнопка добавления контроля)
- Статус проверки - статус прохождения контроля качества по отдельной проверке
В случае, когда контроль качества не пройден, предусмотрена возможность посмотреть по каким конкретно метрикам не прошла проверка. Для этого необходимо нажать на статус Не пройден, после этого откроется окно просмотра списка метрик контролей качества.
- Результаты сканирования по отдельной проверке
- Проблемы безопасности по отдельной проверке
- Дополнительные действия по проверке:
- Начать новое сканирование
- Редактировать проверку
- Импортировать результаты
- Импортировать SBOM
- Удалить проверку
- Добавить проблемы безопасности вручную (доступно для manual- инструмента)
- Дополнительные действия по слою (эти действия также доступны с помощью кнопки напротив слоя в общей иерархии слева):
- Редактировать слой
- Переместить
- Дублировать
- Добавить вложенный слой
- Удалить
- Блок Информация:
- Тип слоя
- Описание слоя
- Другие дополнительные пользовательские поля
- Блок Требования - содержит пользовательские поля, характеризующие дополнительные требования к слою
Создание слоя проекта
Чтобы создать новый Слой проекта, необходимо выполнить следующие шаги:
- В разделе Проекты найти необходимый проект и перейти на страницу обзора проекта
- Перейти на вкладку Слои проекта
- Нажать на кнопку Добавить слой
- Выбрать один из предложенных вариантов создания слоя:
- С нуля - создание слоя с нуля
- По шаблону - используя ранее настроенный шаблон. Отличие от создания «с нуля» в том, что при создании по шаблону форма создания будет заполнена значениями, указанными в шаблоне, а также будет содержать все кастомные атрибуты и требования с предзаполненными значениями.
Подробнее о настройке шаблонов слоев см. раздел Шаблоны слоев проекта.
- Скопировать существующий слой - переиспользование ранее созданного слоя. При выборе этой опции пользователю сначала необходимо найти и выбрать нужный существующий слой (в список не попадают шаблоны слоев). В данном сценарии форма создания не открывается. Если копируемый слой содержит проверки безопасности, то они копируются без источников сканирования (на каждом чеке в колонке источников отображается кнопка добавления источника).
- Далее на странице создания слоя заполнить соответствующие варианту создания слоя поля.
- Далее нажать на кнопку Создать.
После создания всех необходимых Слоев проекта необходимо добавить проверки безопасности.
Создание проверки безопасности
Проверка безопасности - это сущность, которая может объединять в себе связку инструмента сканирования и источника. Она используется для запуска сканирования безопасности, а также для получения результатов сканирований.
Перед добавлением проверок безопасности необходимо убедиться в наличии настроенных интеграций с требуемыми источниками сканирования (в разделе Интеграции → Источники безопасности). В случае, если добавление источников сканирования выполняет не только администратор системы и у пользователя имеется доступ к управлению источниками сканирования, то необходимо добавить требуемые источники сканирования (подробнее см. Источники сканирования).
Для того, чтобы добавить проверку безопасности, необходимо выполнить следующие шаги:
- В разделе Проекты → Название проекта → Слои проекта → Слой проекта нажать на кнопку Добавить (Если не добавлено ни одной проверки) или Добавить проверку безопасности.
- Далее заполнить форму создания проверки безопасности.
При заполнении формы необходимо учитывать следующее:
- При настройке проверки безопасности выбор инструмента безопасности является обязательным. Выбрать возможно только инструмент, ранее добавленный администратором в разделе Интеграции.
- Поля формы зависят от выбранных полей Источник и Инструмент.
- Предусмотрена возможность добавления нескольких веток/тегов источника.
- Также для некоторых инструментов предусмотрена возможность выбора типа запуска сканирования (ручной или автоматический), периодичность и время запуска сканирования при выборе автоматического запуска.
- При выборе инструмента Appscreener SAST для удобства конфигурации предусмотрен функционал формирования и скачивания API-запроса.
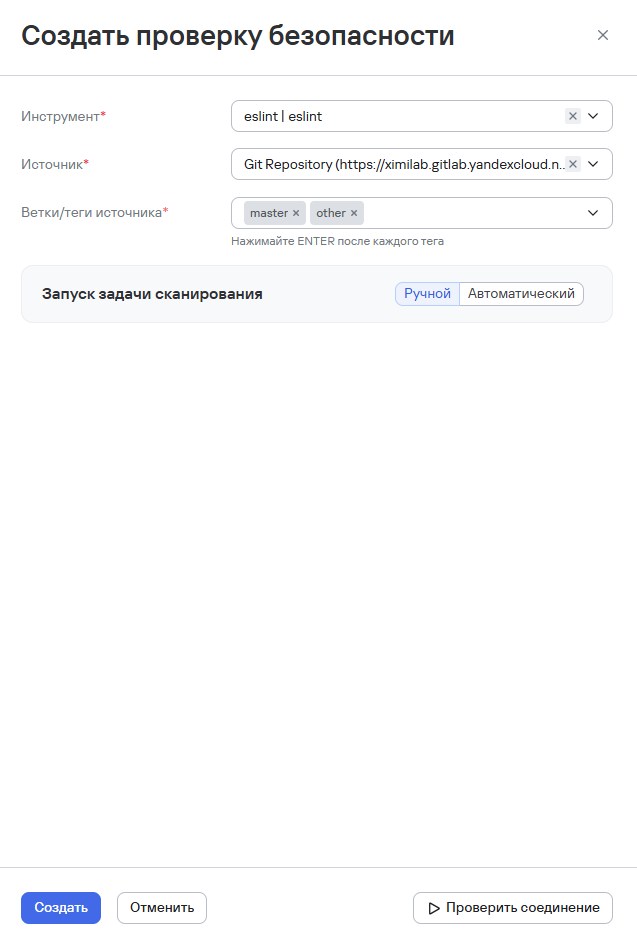
- Проверить соединение с инструментами, нажав кнопку Проверить соединение.
Проверка соединения доступна только в случае, если пользователь ранее ввел данные для аутентификации.
- Нажать кнопку Создать.
- Если при создании интеграции с инструментом безопасности администратор системы не указал метод аутентификации, то при добавлении инструмента в Проверку безопасности поле выбора метода аутентификации является обязательным для заполнения. При выборе метода аутентификации на этапе создания проверки безопасности, необходимо ввести данные для аутентификации в соответствующие поля (могут меняться в зависимости от метода: Токен API, Логин/Пароль).
- Если при создании интеграции с источником сканирования не был указан метод аутентификации, то при добавлении источника в Проверку безопасности заполнение поля выбора метода аутентификации является обязательным.
- При выборе метода аутентификации на этапе создания проверки безопасности, необходимо ввести данные для аутентификации в соответствующие поля.
- При редактировании источника сканирования в ранее созданной проверке безопасности поле Ветки/теги источника показываются или скрываются в зависимости от типа нового источника:
- Если новый источник не использует ветки — поле ветки скрывается;
- Если не использует образы — поле тега скрывается.
Импорт результатов:
В проверках безопасности предусмотрена загрузка (импорт) результатов сканирования от внешних инструментов. Эта опция доступна не для всех инструментов безопасности.